Abstract Nature : Personal Project 1

Abstract Nature : What is Abstraction
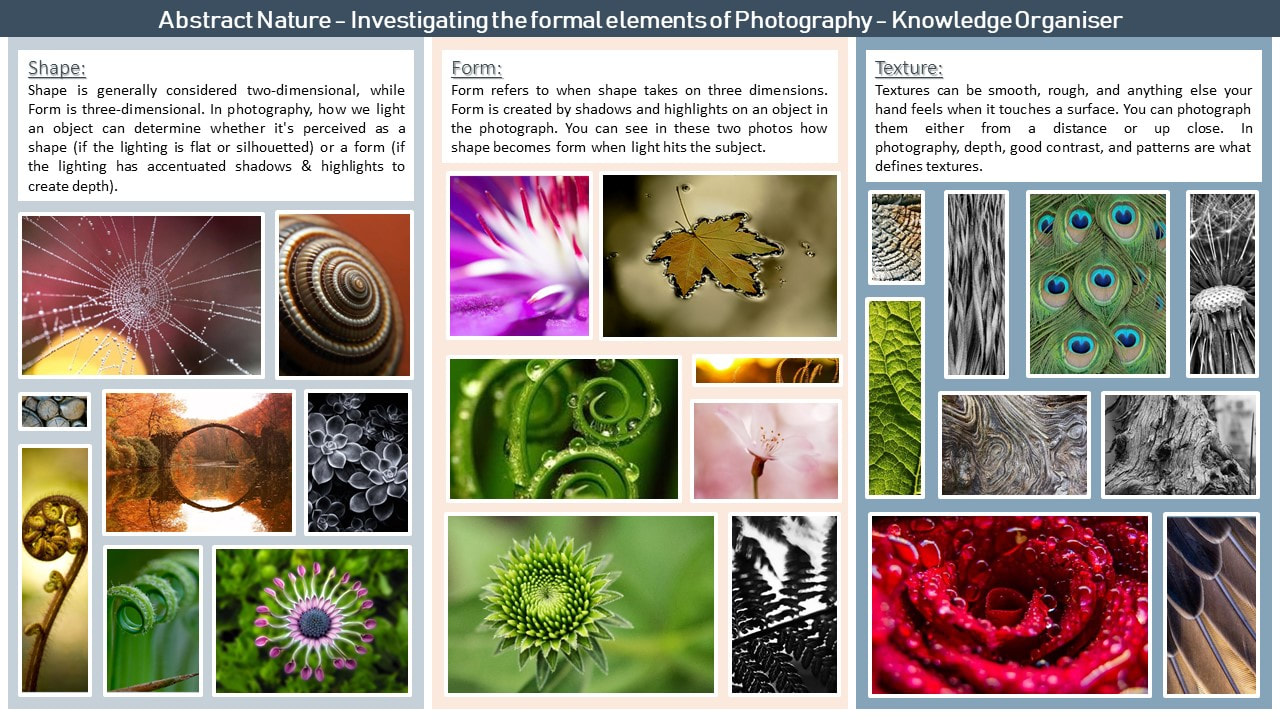
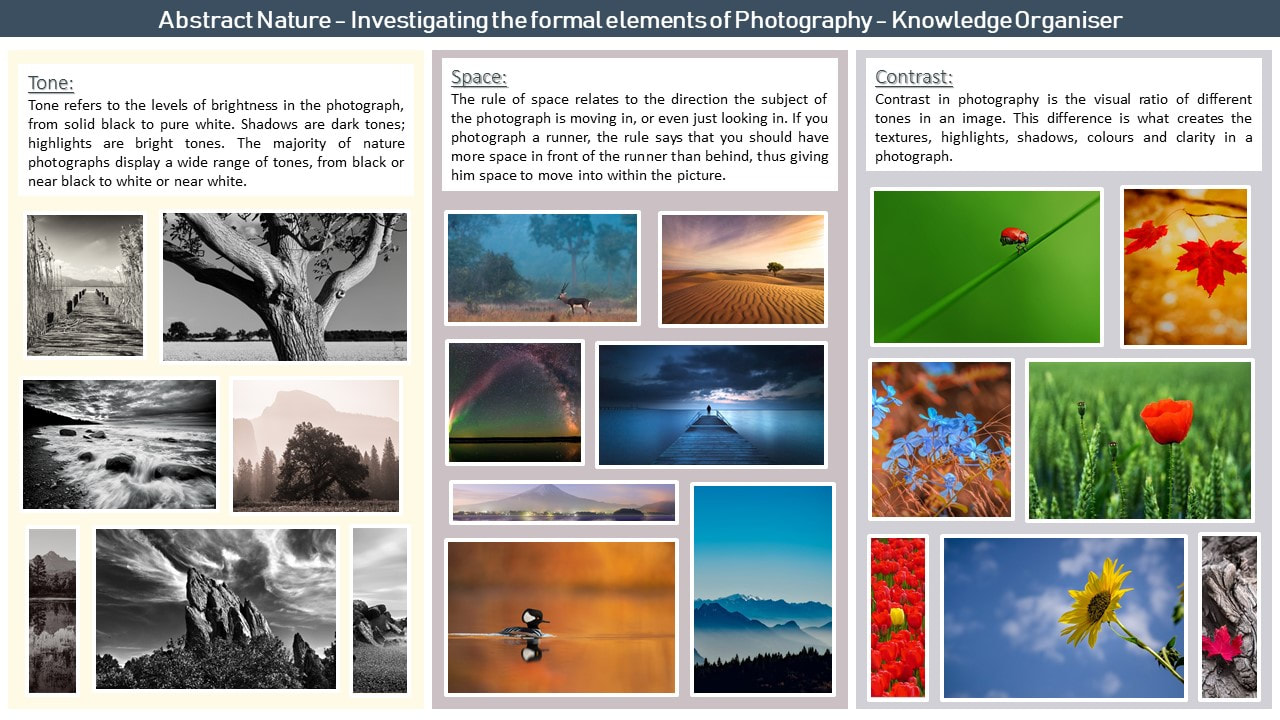
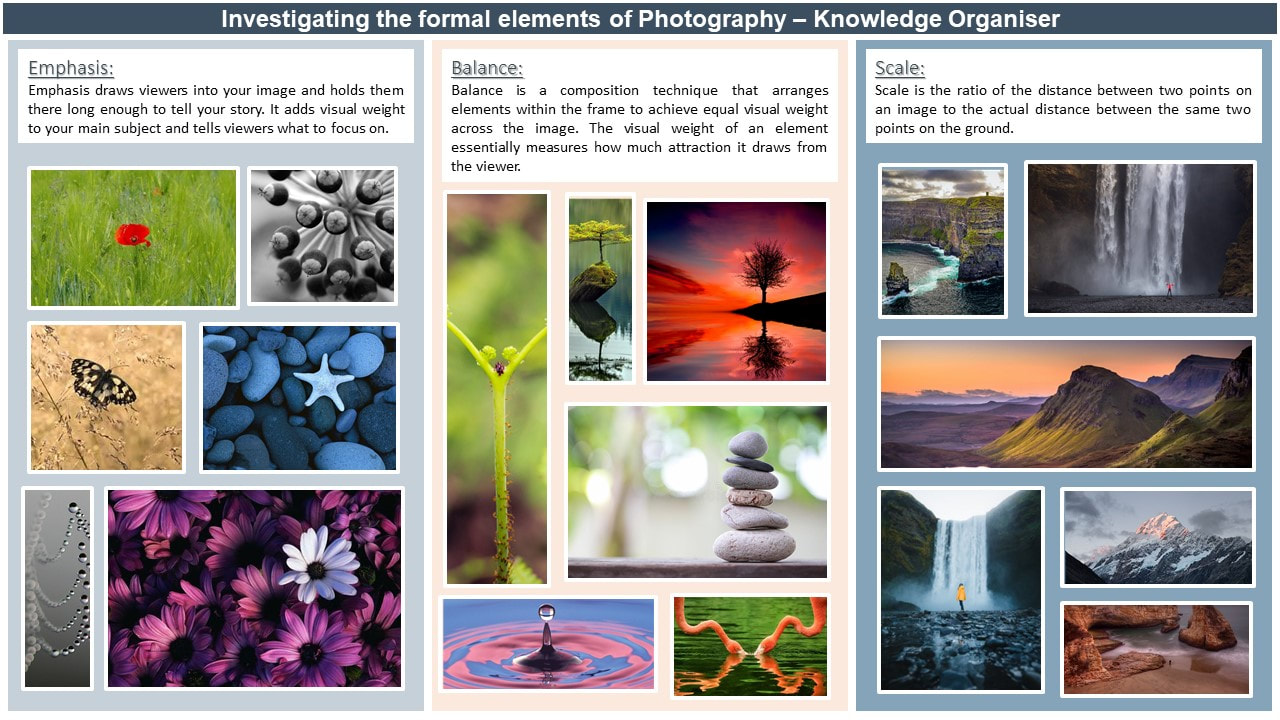
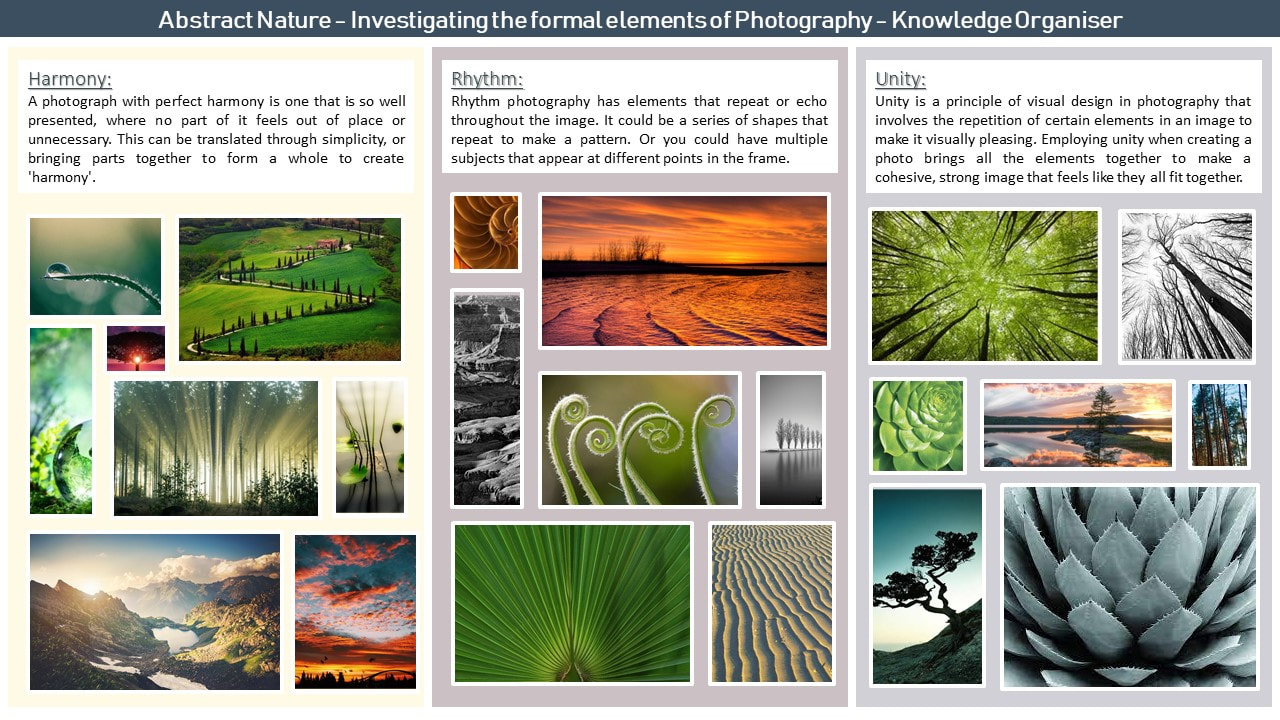
Abstract photography, sometimes called non-objective or experimental photography, is a means of depicting a visual image that does not have an immediate association with the object world and that has been created through the use of photographic equipment, processes or materials. Primarily, abstract photography focuses on the elements of art (line, shape, colour, tone, texture, form, space) and the principles of design (balance, harmony..). These are known as the formal elements of Photography. Below are some examples of abstract photography that I am inspired by and some initial research into the formal elements of Photography.


Abstract Nature: INVESTIGATION OF ABSTRACT TECHNIQUES
Monochromatic Shoot
CONTACT SHEET:


|
For this shoot I used my DSLR camera (Canon 4000D) and the standard kit lens. During this monochromatic shoot my camera had its aperture priority mode on and I changed the picture style to a monochrome filter (black & white). I then set my aperture to the lowest number possible (F3.5) which enabled the camera lens to go wider. Shooting in black and white made me realise how much you can focus on other photogenic elements without colour.
Some benefits I had were the amount of different types of plants and the texture on them because I could get very beautiful and detailed images. It was also easy to focus on the leaves. However, I did have a few struggles during this shoot. Adjusting between manual and automatic mode was one problem as the exposure would often be too bright which would make the image overly white. It was also very difficult to take a good amount of pictures with the amount of time we had as it was a very windy day so I had to delete a lot of pictures that looked blurred and unpresentable. |


|
BEST IMAGES:

|
I feel this image is successful because of the way the formal element of texture, line and shape move dynamically across the image. The use of a shallow depth of field brings clarity to the abstracted leaf form. I also like how clear you can see the focus of the image and how it effortlessly blurs the background focus. The two leaves are also going in different directions so the lines on the leaves are aesthetically pleasing to the eye. |

|
The reason I chose this as one of my best pictures because it is simple and there isn't too much to look at since there is only one leaf that is in focus. Meaning that the eye automatically attracts to that part of the image. I love how the further parts of the leaf are getting blurred so the front part can be more of the main source of this image. I also like how the darker lines on the leaf are both on each side of the leaf so it looks more symmetrical. |

|
The reason I believe that this image is successful is because the texture on the leaves are quite unusual and random. I like how everything else in the image is difficult to tell what it is but the only thing that is recognizable is the main leaf that is the only focused thing in the image. I also like how the leaf isn't exactly vertical so that also adds more of an abstract effect. |

|
I think that this image is successful because most parts of the image is abstract so you can look at almost everything in the picture. This is because the most obvious leaf toward the right looks very similar to the leaves that surround it. The leaf only has a little but of focus in the middle and the beginning and end of the leaf are both blurred. |
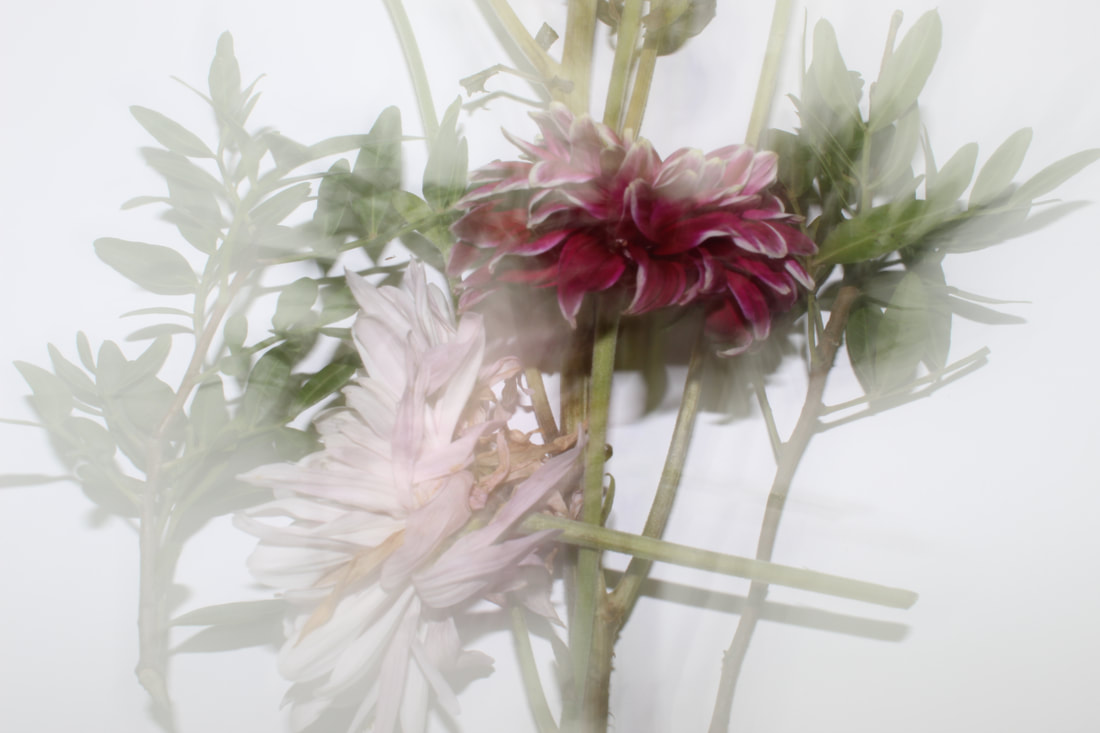
Intentional Camera Movement Shoot
CONTACT SHEET:


|
In intentional camera movement, a camera is moved during the exposure for a creative or artistic effect. This causes the image points to move across the recording medium, producing an apparent streaking in the resulting image.
For this shoot I used my DSLR camera (Canon 4000D) and the standard kit lens. During this shoot I used shutter speed priority mode 1" for intentional motion blur/camera movement. I also used a range of flowers, some with vibrant colours and some with darker colours. When taking the pictures I moved the camera in different directions to create that shaky blur effect. Such as turning the camera, zooming in and out and moving the camera horizontally and vertically. Some benefits I had were that it was very easy to create a blur effect and also the flowers I used made the images look more aesthetically pleasing as the colours corresponded very well with each other. However, I did have a few struggles. One of them being that it was very hard to control how much blur there was as even a little movement could create a lot of blur which would disort the flowers slightly. |


|
Shallow Depth Of Field Shoot
CONTACT SHEET:


|
Shallow depth of field puts your subject in sharp focus and blurs the background or foreground. This is set by a wide aperture. Deep depth of field keeps everything in the frame in equal focus. This is set by a narrow aperture.
For this shoot I used my DSLR camera (Canon 4000D) and the standard kit lens. I set my aperture to F/4 which means that less light can enter the camera. I wanted my images to have some colour in it rather then it all be green so for that I had to go to a park because I had more of a selection to choose from. The benefits I had from this shoot was that it wasn't windy so nothing got in the way or distracted me which meant that all the pictures I took were a success. However, a struggle I had was focusing with the camera because it was difficult to focus when zooming in. So it was quite hard to get a lot of detail on the plants and flowers. |


|
Artist Investigation / Edward Weston
"I see no reason for recording the obvious." ~ Edward Weston

|
To begin my Abstract Nature Artist Investigations, I will initially study the work of Edward Weston because his work is very inspiring and unique which made him a successful photographer. He also used a view camera in the 20th century which is very rare to find nowadays. Edward Weston was born on the 24th of march 1886 and is known for "one of the most innovative and influential American photographers..." and "one of the masters of 20th century photography."I chose this quote because it opened my eye on how to view normal objects as something completely interesting and unique.
|
This video is inspirational to me because Weston photographed different things such as landscapes, plants and buildings. Below are a selection of 10 Weston images that are inspirational to me because it is amazing how much he can change something just by using a view camera.


SEMI Analysis / Edward Weston
|
The Photographer of this image is called Edward Weston. The title of this Photograph is called 'Pepper No. 30' dating back to 1930.
The genre of this photograph (still-life) is considered one of the most iconic modernist images. Still life is a work of art that shows inanimate objects from the natural or man-made world. The making of this photograph, along with his other still life's, not only fostered Weston's development as an artist, but also contributed greatly to the evolution of photography as a modernist art form. The props I can see in this picture are a solitary green pepper in rich black-and-white tones, with strong illumination from above. The composition of the photo shows that the pepper is placed in the centre of the picture as there is an equal amount of space around the object and because eyes are drawn to it immediately. This photo has been taken from a short distance so Weston must have placed the camera close to the pepper or has either cropped it from all sides so the object takes a large portion of the image. As the light source of this image is coming from above, the top of the pepper is more brighter and has more of a highlight because the light reflects off it. The object also has a line of symmetry in the middle that slightly curves. Due to the light source being above, shadows are created which also adds more contrast and more of a monochrome effect. The pepper has an unusual shape which also looks similar to a human spine. The circled parts of my annotations show the texture on the pepper which makes the photo more abstract. The object and background mix well because there is a gradient effect from top to bottom with the monochrome colours - black to white/light grey. |


|


Technical Processes / Low Key Photography

|
Low-key photography is a genre of photography consisting of shooting dark-coloured scenes by lowering or dimming the "key" or front light illuminating the scene, and emphasizing natural or artificial light only on specific areas in the frame.
This genre of photography is quite challenging for any range of shooters as some photographers might get mixed up between high and low key photography. The one thing I particularly like about low key photography is the ability it holds to add drama and hard-hitting emotion within a shot. |
Shoot Plan / Edward Weston

|
This shoot was inspired by Edward Weston because I love how imaginative and unique he is with his pictures and how he takes them. Weston is well known for his monochromatic shoots so he created some shadows (the plant pot) whilst also highlighting parts of his shoot (sunlight) to create different black & white shades. Therefore, he angles the plant pot so that only some light can reach the object. For my shoot I took it in the morning because that was when the sun was more visible. I placed a black pot next to a window with black paper so it can blend with the pot. This shoot is high-key photography as it aims to reduce the lighting ratio present in the scene. I took this shoot indoors because too much light would over expose the image. My ISO settings were quite low so my camera wasn't over-sensitive to light. My shutter speed settings were set to 1/160 and my aperture was at f/12 to control the amount of light entering the camera lens.
|

|
This shoot was inspired by Edward Weston because he was known for taking images of imperfect and obscure everyday objects showing there texture and patterns which our naked eye tends to ignore. This shoot took place indoors using artificial lighting at a time of day where sun as shining into the classroom so we closed off any places where natural light was shining through. The props we used for this shoot are vegetables as Weston was known for taking shoots of vegetables. We also used large black paper as a backdrop giving it that dark plain background Weston always has. The lighting required was a bright artificial light. I experimented using low key photography as I had a steady camera on a flat surface and had a dark background highlighting where the light hit the object. For this shoot I used a Canon DSLR 400D camera set to a high F6.3 aperture setting and the ISO was on an auto setting.
|
Edward Weston Ambient Light Plant Pot (framing) Shoot
CONTACT SHEET:

Artificial Light Shoot
CONTACT SHEET:

Editing Process Low Key Photography


BEST IMAGES:

|
The reason I chose this as one of my best images because I like how the pepper is directly in the center and the shape of it fits perfectly as it is slightly symmetrical. It is also very easy to tell where the source of light is coming from which also creates contrasting tones and a gradient affect from the top right to the bottom left. The main focus point is right in the middle which allows the eye to also see all around the image and make it more satisfying to see. The pepper was placed in a plant pot so when I shot the picture there was a hole in the background which ruined the image of the pepper so I removed it by using the lasso tool and reducing the contrast and brightness to blend in with the black background.
|

|
I chose this image as one of my best images because there is a vast amount of detail which attracts the viewers eye to see all around the image. For that reason I slightly increased the brightness and the white tones so that more of the object and detail can be noticed. This photo is very abstract as the design of the object is very unique and is very odd to figure out. Because of the fine detail, the viewer may assume that this image has been taken professionally with an expensive camera in a studio.
|

|
This image was chosen as one of my best images as it very different from the previous images. This is due to the amount of shadows being created as the lettuce is full with different heights. This creates a beautifully contrasted image and viewers are drawn to specific areas of the image which can be either the less contrasted parts or the more contrasting parts in the photo. I also like how towards the front and back of the image it is slightly blurred which also supports the eye to focus towards the middle.
|

|
This was the final image chosen as one of my best images because of the different shapes and detail in the image. I love how at the point of the spikes it is brighter because it also contrast with the actual base on the right as it is darker. This effect allows your eye to look around the object as there is always something stood out to look at. The light source is pointed from the bottom and the pineapple is tilted which matches as there is a direct line in the middle which shows where the light hits and where it doesn't.
|
Abstraction through Cyanotypes / Anna Atkins

|
Anna Atkins was an English botanist and photographer. She is often considered the first person to publish a book illustrated with photographic images. Some sources say that she was the first woman to create a photograph.
The cyanotype is a photographic printing process that produces blue prints using coated paper and light. The advantages of the cyanotype method is that it is very safe, cheap and easy to do. You can print on a various types of material and you don't need any complicated equipment and no darkroom just light needed. Also its a high contrast prints and it's very fast to print. The disadvantages are that they could come out really pale and could make your image look muffled and you won't be able to make the image out properly. When making cyanotypes you also need the sun light because it's a natural source of light so you must be outside. |


Cyanotypes are still used today as alternative printing medium; however, during the 20th century, as photography and technology advanced, the technique became somewhat obsolete. It reverted to primarily being used for replicating architectural diagrams and design notes such as blueprints. While the cyanotype process is hailed for its simplicity, it is also extraordinarily complex. The selected photographers collaged, toned, stitched, assembled with this process to create both two-dimensional and three-dimensional photographs that push creative boundaries to enhance the emotional quality of their art.


To create my cyanotype I first painted on some ink made from iron salts and then let it dry. After that, I then placed different shaped leaves onto paper and then pinned them down so that they wouldn't move. I then placed it in a box under a UV light so that the ink would turn into a dark blue colour. When I removed the leaves it created a light blue silhouette and I put it under water so that it would turn more white and contrast well with the dark blue. For the fabric, I did the same method but just not with paper. For the acetate, I placed it over the ink and pinned it. I repeated the process of placing it under the UV light and the acetate printed onto it.
I think that my most successful cyanotype is the fabric one because there is an amazing amount of detail from the leaf and the slightly yellow tint contrasts well with the blue.
I think that my most successful cyanotype is the fabric one because there is an amazing amount of detail from the leaf and the slightly yellow tint contrasts well with the blue.
Abstraction through Photograms / Man Ray

|
Man Ray was an American visual artist who spent most of his career in Paris. He produced major works in a variety of media but considered himself a painter above all.
A photogram is a photographic image made without a camera by placing objects directly onto the surface of a light-sensitive material such as photographic paper and then exposing it to light. The advantages are that it is a great way to create abstract images as the stark contrast of the bright white create abstract images as the stark contrast of the bright white impression and black exposed background, make the object stand out distinctly. The disadvantages are that it is much harder to achieve certain levels of detail and the final outcome of the image is often more unpredictable as the amount of detail that will be picked up is limited and inconsistent. |


Horst P. Horst / The Unfamiliar and Abstracted


Technical Processes / High Key

|
High key photography is a term to describe images that are bright and contain little to no shadow. It is also sometimes used to the photographic style that is simply bright often with an overexposed background. Using high key lighting gives your image a unique look. These photos are perfect for creating a happy feeling when the viewer sees the image. If you want to convey a sense of joy, high key lighting is typically the best way to do that.
Here are some examples of High Key Photography... |


SEMI Analysis / Karl Blossfeldt

|
The main focal of the image is the flower (Saxifraga). I can tell this because the lower is placed in the middle ground of the picture. So that People can look at all of the flower not just bits of it and you can see lots of detail on the flower as well. I believe this photo has been taken inside using a studio with bright lights using a lamp because the photographer doesn't want any shadows in the image otherwise you would not be able to see the detail in the flower.
To create this photograph myself I will need a canon 4000D with the rule of thirds setting on the camera, so that the object can be in the centre of the photo. I will have 1/60 of the shutter speed which is fast so there wont be any motion or motion blur in the picture. The shooting environment should be very bright as you are trying to get as much light to the picture as possible as you don't want the image to be dark, which means the IOS should be very bright. |
|
Karl Blossfeldt's use of composition, leading lines & perspective enables the viewer's eye to be lead around the image. The birds eye perspective that Karl Blossfeldt has utilised is effective because you can see the leading line and the unique texture and pattern of the flower. The photographer uses a range of visual elements in his work. The most striking elements are: the use of black and white tones and negative space. This is effective because it allows the main focal point to be defined and bold. Furthermore, the clarity of the textures show Blossfeldt's talent with photography and his evident love of plants.
The photograph has been taken from a short distance so that the plant can remain in the main field of view. Blossfeldt used natural light (presumably from the window) to create effective side lighting; there was no elaborate studio set up. It highlights the upper part of the image, whilst the centre of the plant remains the most unexposed. The clarity of the image presents the initial beauty of the plant. There is also a contrast with the white background. To emulate this photograph, I would use a faster shutter speed to let less light in and also use a wide aperture. I feel the photo gives the image of calmness. I think this because the Colours are quite simple because the colours are just white and a dark grey. When I take my own photographs, I will try to recreate this feeling of atmosphere by making sure there is not a lot or no shadows at all, but if the image is too bright then when I come to edit it i will darken it down to make it look like Karl Blossfeldt work. |


|


Shoot Plan / Karl Blossfeldt


|
This shoot was inspired by Karl Blossfeldt as I have been studying the way he creates abstracted forms from nature and was drawn to the way he depicts his chosen object in such a delicate and intricate way, in which the viewer can follow his leading lines and his bold textures that the viewer would be drawn to seeing first.
The shoot will take place in the classroom, with ambient light and a white backdrop to create high key photography inspired images. I will shoot in High-Key for the majority of my images using a combination of soft boxes, LED Lighting and also natural ambient light. I will need to control the lighting to avoid shadows and contrast. The props used will be natural forms such as shells, flowers, leaves etc. because these were commonly seen in Blossfeldt's work and provide good amounts of texture, line and form. I will use my DSLR 4000D camera and experiment using a tripod to see whether a more stable and high key photography image can be produced successfully. The High-Key shoot setup will need a camera aperture of f/22 and a shutter speed of 1“ or 2" (to allow lesser light in). I experimented with a 1/60 shutter speed whilst I used the tripod as if it was any faster I wouldn't get the details. I intend to use a small aperture f/22 for a large depth of field and will shoot in sepia to give an aged look to the photoshoot. This will help, as Blossfeldt's work was uniquely coloured and therefore by using the option sepia, it could help me to emulate his work better. |


Artist Research / Karl Blossfeldt
"Nature educates us into beauty and inwardness and is a source of the most noble pleasure." - Karl Blossfeldt

|
Karl Blossfeldt was a German photographer, born in 1865. As a sculptor, teacher and artist who practised in Berlin, he is best known for his photography of plants, shown in the 1928 book 'Unformen der Kunst' (Art Forms in Nature).
I chose this quote because I feel it sums up the genre of nature photography and how photography can be interpreted. I chose this video because I feel it presents Blossfeldt's artwork very well and goes into depth on how it was created and used. He also goes into some detail on how the images were created and what their original propose was. The intricacies of the plants are emphasised by the neutral backgrounds and the skilful understanding of the quality of the specimens. Blossfeldt used a homemade camera that magnified his subject matter. His method accentuates their shape and structure. Although Blossfeldt's approach was primarily scientific, his photographs portray an undeniable beauty. This classic work still inspires photographers and designers today. |


Contact Sheets / Karl Blossfeldt


Editing Process / Karl Blossfeldt
To edit my Karl Blossfeldt images I used the online image editing software PIXLR. When editing my images I focused on three key areas of cropping, adjusting the background and amending the levels of the image. Here are some screen shots of this editing process.
1. Cropping the image using the rule of thirds:

2. Using the magic wand tool to select and edit the background:

3. Adjusting the levels of the image for the correct range of tones and contrast:

9 Best Images / Karl Blossfeldt


Artist Investigation / Dennis Wojtkiewicz

|
"I use a Canon EOS 90D camera with a Canon EF 100mm f/2.8 Macro USM fixed lens. The only reason I even know about the technology is because my colleague told me that's what I needed and would be the biggest bang for the buck. The rest of it is all by feel. I have absolutely no photo training. For me that suffices because I'm not hung up on technical stuff. Just looking for ways to capture information for my paintings." - Dennis Wojkiewicz |

|
The final artist in the Abstract Nature project is Dennis Wojtkiewicz. This artist differs from my other artists because he uses his images to create paintings out of them. However, there are similarities in his use of the lighting as he puts his source of light behind the object which is the similar as the flash back method.
Dennis Wojtkiewicz was born in 1956 and is most famously known for his large scale renderings of sliced fruits and flowers. Macro Photography is extreme close-up photography, usually of very small subjects, in which the size of the subject in the photograph is equal to (ratio 1:1) or greater that (ratio 2:1) life size. |
|
His website is: www.wojtkiewiczart.com
The quote is from a direct email response from Dennis. W himself. From the email, I was able understand what equipment & techniques he uses such as the Canon EIS 90D Camera and the back lighting technique. This video is inspirational to me because it shows a variety of different complementary colours and the contrast in each image. Each photograph also has a satisfactory amount of balance and harmony which attracts the eye. |


Photographic Technique / Back Lighting Fruit

|
Backlighting is a form of photography that involves positioning the main light source for the photograph behind the primary subject. The use of backlight can benefit the viewer as it emphasizes the depth behind the subject and gives images a greater sense of place, and can produce a dramatic contrast between the subject and the background.
This can be an especially effective technique when shooting outdoor portraits. For this shoot we specifically needed to use a backlight as it causes light to shine through the fine details of the fruit allowing their appearance to be shown in depth to the viewer. |


|
Step 1: Slice the fruit
|
Step 2: Position your backlight to be directly under your glass.
|
Step 3: Adjust your ISO, shutter speed and aperture to fit your surrounding area, and your exposure levels.
|
Step 4: To gain stable images, use a remote shutter cable and a tripod so that when using a slower shutter speed your image is not affected and you can still gain fine details.
|
Shoot Plan / Dennis Wojtkiewicz

This shoot has been inspired by the paintings of Dennis Wojtkiewicz, he uses backlighting to create his reference images and a main feature of his paintings is colour. This is what I will attempt to create the vivid, saturated, luminous colours seen in his work.
This shoot will be conducted indoors, giving me greater control of the lighting. There will be ambient light coming from the window however the majority will come from an artificial light placed under a glass table / glass sheet. This is what the fruit slice will be placed on as the transparent surface will allow the light to pass through the table and show the delicate details of the subject.
I will use a range of fruits such as a kiwi, grapefruit, orange, lemon, and lime. It is essential that they are sliced thinly, otherwise the fruit will not be translucent enough for the light to reveal its fine details. I will also need a knife and cutting board to do so.
For this shoot I will be using a DSLR camera with a macro lens; part of the shoot will also be conducted using a reverse ring to capture some photos in extreme macro detail. To eliminate camera shake I will use both a tripod and remote release cable.
The camera settings will have an aperture of f/8-f/12, a low ISO for better image quality; slow shutter speed to allow lots of light in the camera: a two second timer to reduce camera shake and finally in the extreme macro/reverse ring element of the shoot, will have a longer 4-5 second timer as avoiding camera shake is essential to capture any clear details.

Post Editing / Dennis Wojtkiewicz

Editing Step 1: In this clip, I used the adjustment tools to enhance the colour saturation and contrast within my images. This helped to amend my exposure and bring forth fine detail within the fruit.

Editing Step 3: Next, I reduced the size of the fruit using the arranged tool and duplicated it many times and selected some of the fruits to make them rotate and flip.
|

Editing Step 2: In this screenshot, I deleted the background by using the lasso tool. For the background, I added a white layer using the paint bucket tool behind the fruit.

Editing Step 4: Lastly, I selected some of the layers and used the auto black and white tool to create a monochrome effect. For the other layers, I increased the saturation and even changed the tint and hue to be within the same colour palette.
|
Rotational Designs / Dennis Wojtkiewicz
Using rotational symmetry and the work Horst P. Horst I have created a series of rotational design using the abstract elements of shape, colour, form, tone repetition and harmony. I will develop these further using PIXLR.


Personally, I like the outcome of the 2nd and 3rd edit. The overlapping of the different images are clear and evident which makes them look more abstract. The use of monochrome on some images makes the colours appear as more contrasted and saturated.
For the fruits, I used warm tones so that the images can be more aesthetic and pleasing to the eye. The use of the warm tones also match the colours of the original fruit so that they can be identified.
For the fruits, I used warm tones so that the images can be more aesthetic and pleasing to the eye. The use of the warm tones also match the colours of the original fruit so that they can be identified.


My personal favourites are the 1st and last edit. I love how the colours have both warm (orange) and cool (green) tones because it creates a tropical look. I overlapped my original image with the rotational ones. This creates an abstract but also an interesting look because there are many things to look at.
In my first image, the colours are overall more saturated and the green tone towards the middle even looks teal which adds a nice touch to the image and makes it unique out of the other three. However, the last image looks less saturated because the overlays are mostly monochromatic so there is more black and white than colour.
In my first image, the colours are overall more saturated and the green tone towards the middle even looks teal which adds a nice touch to the image and makes it unique out of the other three. However, the last image looks less saturated because the overlays are mostly monochromatic so there is more black and white than colour.


My two favourites from my best images are the 2nd and 3rd images. I like how the 2nd image uses different colours such as green, yellow and red. It also has a bit of black which contrasts nicely with the luminous colours. However, the image does have a lot of contrast which ruins how the colours look.
My 3rd image is very pleasing to the eye as it has many layers that don't look messy but also aesthetic and abstract at the same time. The use of monochrome on different areas of the image is beautiful as there aren't too many bright colours.
My 3rd image is very pleasing to the eye as it has many layers that don't look messy but also aesthetic and abstract at the same time. The use of monochrome on different areas of the image is beautiful as there aren't too many bright colours.
Final Outcomes


Abstract Nature / Hand Manipulation Sample Board

Abstract Nature / Final Evaluation
During this project, I have developed my understanding of abstract photography by exploring the theme of nature. Firstly, I researched the work of Edward Weston and I loved how he used low key photography to present his work in a unique way. The one thing I particularly like about low key photography is the ability it holds to add drama and hard-hitting emotion within a shot. His photography is admirable and helps to learn and explore the variety of concepts regarding line, shape and harmony and the multiple ways elements can be incorporated. Through studying this artist I was able to explore concepts of line, shape and harmony in my own photography examples. I investigated the technical processes such as using the monochrome setting on my camera. Another way Weston makes his work special is that he used a view camera whenever taking photos. For my research, I watched many videos about how he takes his photographs and it influenced me to take those habits for my own images. He is inspirational to me because Weston photographed different things such as landscapes, plants and buildings. It amazed me how much he can change something just by using a view camera.
For my next project, I studied the work of Anna Atkins (a 19th century photographer). She is often considered the first person to publish a book illustrated with photographic images. Some sources say that she was the first woman to create a photograph. Through studying this artist I was able to explore concepts of line, shape and harmony in my own photography examples. Atkins is well known for her unique way of creating photographs. She uses cyanotype to create her work. Cyanotypes are still used today as alternative printing medium; however, during the 20th century, as photography and technology advanced, the technique became somewhat obsolete. It reverted to primarily being used for replicating architectural diagrams and design notes such as blueprints. To emulate her work, I first painted on some ink made from iron salts and then let it dry. After that, I then placed different shaped leaves onto paper and then pinned them down so that they wouldn't move. I then placed it in a box under a UV light so that the ink would turn into a dark blue colour. When I removed the leaves it created a light blue silhouette and I put it under water so that it would turn more white and contrast well with the dark blue. I think that my most successful cyanotype was the fabric one because there is an amazing amount of detail from the leaf and the slightly yellow tint contrasted well with the blue.
The 3rd photographer I researched was Man Ray. He was an American visual artist who spent most of his career in Paris. He produced major works in a variety of media but considered himself a painter above all. What interested me mostly about his work is that is was quite unusual because they were called 'Photograms'. A photogram is a photographic image made without a camera by placing objects directly onto the surface of a light-sensitive material such as photographic paper and then exposing it to light.
Next, I researched the work of Horst P. Horst who was a fashion photographer that used rotational symmetry to create new patterns. To emulate his work I used a combination of previously taken photographs and rotated them using the editing website PIXLR. I learnt from Horst that post editing can also lead to effective abstraction of nature.
The next photographer I studied was Karl Blossfeldt who was a German photographer, born in 1865. As a sculptor, teacher and artist who practised in Berlin, he is best known for his photography of plants, shown in the 1928 book 'Unformen der Kunst' (Art Forms in Nature). It was interesting to research him and look at his work because he used the method called 'High Key Photography'. High key photography is a term to describe images that are bright and contain little to no shadow. Using high key lighting gives your image a unique look. These photos are perfect for creating a happy feeling when the viewer sees the image. If you want to convey a sense of joy, high key lighting is typically the best way to do that. The thing that was captivating for me was his use of composition, leading lines & perspective which enabled the viewer's eye to be lead around the image. The birds eye perspective that Karl Blossfeldt has utilized is effective because you can see the leading line and the unique texture and pattern of the flower. The photographer uses a range of visual elements in his work. The most striking elements are: the use of black and white tones and negative space. This is effective because it allows the main focal point to be defined and bold. Furthermore, the clarity of the textures show Blossfeldt's talent with photography and his evident love of plants.
The Final artist I investigated was Dennis Wojtkiewicz. He differs from my other artists because he uses his images to create paintings out of them. However, there are similarities in his use of the lighting as he puts his source of light behind the object which is the similar as the flash back method. He is most famously known for his large scale renderings of sliced fruits and flowers. Macro Photography is extreme close-up photography, usually of very small subjects, in which the size of the subject in the photograph is equal to (ratio 1:1) or greater that (ratio 2:1) life size. Backlighting is a form of photography that involves positioning the main light source for the photograph behind the primary subject. Through studying Wojtkiewicz, For my shoot I used a DSLR camera with macro lens; part of the shoot was also conducted using a reverse ring to capture some photos in extreme macro detail. To eliminate the camera shake I used both a tripod and remote release cable.
The camera settings had an aperture of f/8-f/12, a low ISO for better image quality; slow shutter speed to allow lots of light in the camera: a two second timer to reduce the camera shake and finally in the extreme macro/reverse ring element of the shoot, I had a longer 4-5 second timer as avoiding camera shake is essential to capture any clear details.
Overall, I really enjoyed this topic and learning different photography methods was exciting and fun. My photography knowledge has increased a lot since the beginning of the year and hopefully I can use this knowledge in the future.
